21 KiB
duration, description, level, roles, products, keywords, inject-note
| duration | description | level | roles | products | keywords | inject-note |
|---|---|---|---|---|---|---|
| PT1H00M0S | Migrate your APIs to Oracle Cloud API Gateway with Oracle Integration | Advanced | Devops;Developer | en/cloud/oracle-cloud-infrastructure/oci | api gateway;oracle integration;APIs REST/SOAP | true |
Migrate your APIs to Oracle Cloud API Gateway with Oracle Integration
Introduction
The API Gateway service allows you to publish APIs with accessible private endpoints on your network and that you can expose with public IP addresses if you want them to accept internet traffic. Endpoints support API validation, request and response transformation, CORS, authentication and authorization, and request limitation.
Using the API Gateway service, you create one or more API gateways on a regional subnet to process API client traffic and route it to back-end services. You can use a single API gateway to link multiple back-end services (such as load balancers, compute instances, and OCI Functions) into a single consolidated API endpoint.
You can access the API Gateway service to define API gateways and API deployments using the Console and the REST API.
The Gateway API service is integrated with Oracle Cloud Infrastructure Identity and Access Management (IAM), which provides easy authentication with native Oracle Cloud Infrastructure identity functionality.
The OCI API Gateway allows API deployment to be done by importing a JSON structure. Here you can see what the format of this structure looks like: Creating an API Deployment Specification
{
  "requestPolicies": {},
  "routes": [
    {
      "path": "<api-route-path>",
      "methods": ["<method-list>"],
      "backend": {
        "type": "<backend-type>",
        "<backend-target>": "<identifier>"
      },
      "requestPolicies": {}
    }
  ]
}
In addition to the console, it is possible to deploy the API using the OCI CLI and also the OCI REST service for the API Gateway. Here is the documentation to understand how to deploy:
- Deploy an API using OCI CLI API in Python
- Deploying an API on an API Gateway by Creating an API Deployment
If you already have your API structure to deploy in the standard OCI API Gateway format, it is easy to deploy it using the console (import), OCI CLI or by making a REST call. And having this structure ready, it is easy to create code to process multiple JSON files. This example below demonstrates how to process files using bash script code:
#!/bin/bash
# Folder containing JSON files
folder="/<your path to the JSON Files>"
# Loop through the JSON files in the folder
for file in "$folder"/*.json; do
    service="${file##*/}"; service="${service%.*}"
    echo "Service: $service"        # Read and display the contents of the JSON file
    oci api-gateway deployment create --compartment-id ocid1.compartment.oc1..xxxxxxxxxxxxxxxxxxxxxxxxxx --display-name $service --gateway-id ocid1.apigateway.oc1.iad.xxxxxxxxxxxxxxxxxxxxxxxxxxxx --path-prefix "/$service" --specification file://$file --debug
    echo "-------------------"
done
In some situations, API metadata information will need to be handled. We could do this through code using Python, Java or another language, but the purpose of this article is to use Oracle Integration to automate it. There are several advantages to doing it this way:
- Ease of executing REST calls from OCI API Gateway to deploy your APIs
- Ease of mapping attributes from source to destination, including making the appropriate transformations
- Easily implement flow to process all settings graphically
Objectives
- Explain how to import your Legacy APIs specification to the OCI API Gateway
- Explain the known formats and what format OCI API Gateway can import natively
- Create an OIC process to migrate a source API deployment definition to the OCI API Gateway
- Process many sources definitions
- Differentiate REST and SOAP definitions
- Map the source attributes to the target OCI API Gateway
- Deploy into the correct environment (QA, DEV)
Prerequisites
- An Oracle Integration instance created
- The OCI API Gateway instances created (in this example, one for QA and other for DEV environments)
Task 1: Understand your Source API data structure
We can start from an API metadata structure. The best known definitions would be Open API or Swagger.
If you have a SWAGGER or an OpenAPI, don't worry, you can import your API data to OCI API Gateway by importing in your OCI Console, OCI CLI or OCI API Gateway REST Service. See this article to do this: Creating an API Resource with an API Description
But if you don't have these formats (Swagger/OpenAPI), you need to structure your API data definitions in another format. In this material, we will start by thinking about an Excel structure and, from this structure, transform it into JSON.

So, there is a JSON structure to work!
[ {
  "API_NAME" : "cep",
  "TYPE" : "REST",
  "METHOD" : "GET",
  "PATH_PREFIX" : "/okecep",
  "PATH" : "/cep",
  "ENDPOINT" : "http://x.x.x.x/cep",
  "QUERY_PARAMETERS" : "cep",
  "GROOVY_SCRIPT" : "",
  "AUTHENTICATION_TYPE" : "BASIC",
  "ENVIRONMENT" : "QA",
  "HEADER" : "",
  "HEADER_VALUE" : ""
}, {
  "API_NAME" : "calculator",
  "TYPE" : "SOAP",
  "METHOD" : "POST",
  "PATH_PREFIX" : "/dneonline",
  "PATH" : "/calculator",
  "ENDPOINT" : "http://www.example.com/calculator.asmx",
  "QUERY_PARAMETERS" : "",
  "GROOVY_SCRIPT" : "",
  "AUTHENTICATION_TYPE" : "BASIC",
  "ENVIRONMENT" : "DEV",
  "HEADER" : "",
  "HEADER_VALUE" : ""
} ]
These API data structure can be find here: source_apis.json
You can structure your API definitions data in any format, here is just an example to work.
Task 2: Understand the OCI API Gateway Deployment Data
In this section, you can see the native format to import your APIs definition into the OCI API Gateway.
Often, a simple structure is enough to implement an API, but as details such as security, header rules, parameters or other details appear, the JSON structure becomes larger. Well, this would be the complete JSON structure for any type of deployment. We will use it in our OIC flow. You can find the file here: apigw_structure.json
 {
    "requestPolicies": {
      "authentication": {
        "type": "CUSTOM_AUTHENTICATION",
        "tokenHeader": "",
        "tokenQueryParam": "",
        "tokenAuthScheme": "authentication-scheme",
        "isAnonymousAccessAllowed": false,
        "functionId": "ocid1.fnfunc.oc1.phx.aaaaaaaaac2______kg6fq",
        "maxClockSkewInSeconds": 0,
        "validationPolicy": {
          "type": "REMOTE_DISCOVERY",
          "clientDetails": {
            "type": "CUSTOM",
            "clientId": "client-id",
            "clientSecretId": "secret-ocid",
            "clientSecretVersionNumber": 0
          },
          "sourceUriDetails": {
            "type": "DISCOVERY_URI",
            "uri": "well-known-uri"
          },
          "isSslVerifyDisabled": true,
          "maxCacheDurationInHours": 0,
          "additionalValidationPolicy": {
            "issuers": ["issuer-url", "issuer-url"],
            "audiences": ["intended-audience"],
            "verifyClaims": [{
              "key": "claim-name",
              "values": ["acceptable-value", "acceptable-value"],
              "isRequired": true
            }]
          }
        },
        "tokenHeader": "Authorization",
        "validationPolicy": {
          "type": "REMOTE_DISCOVERY",
          "clientDetails": {
            "type": "CUSTOM",
            "clientId": "5hsti38yhy5j2a4tas455rsu6ru8yui3wrst4n1",
            "clientSecretId": "ocid1.vaultsecret.oc1.iad.amaaaaaa______cggit3q",
            "clientSecretVersionNumber": 1
          },
          "sourceUriDetails": {
            "type": "DISCOVERY_URI",
            "uri": "https://my-idp/oauth2/default/.well-known/openid-configuration"
          },
          "isSslVerifyDisabled": false,
          "maxCacheDurationInHours": 2,
          "additionalValidationPolicy": {
            "issuers": ["https://identity.oraclecloud.com/"],
            "audiences": ["api.dev.io"],
            "verifyClaims": [{
              "key": "is_admin",
              "values": ["service:app", "read:hello"],
              "isRequired": true
            }]
          }
        }
      },
      "mutualTls":{
        "isVerifiedCertificateRequired": true,
        "allowedSans": ["api.weather.com"]
      }
    },
    "routes": [
      {
        "path": "/weather",
        "methods": ["GET"],
        "backend": {
          "type": "HTTP_BACKEND",
          "url": "https://api.weather.gov/${request.auth[region]}"
        },
        "requestPolicies": {
          "authorization": {
            "type": "ANY_OF",
            "allowedScope": [ "weatherwatcher" ]
          },
          "headerValidations": {
            "headers": {
              "name": "header-name",
              "required": true
            },
            "validationMode": "ENFORCING|PERMISSIVE|DISABLED"
          },
          "queryParameterValidations": {
            "parameters": {
              "name": "query-parameter-name",
              "required": true
            },
            "validationMode": "ENFORCING|PERMISSIVE|DISABLED"
          },
          "bodyValidation": {
            "required": true,
            "content": {
              "media-type-1": {
                "validationType": "NONE"
              },
              "media-type-2": {
                "validationType": "NONE"
              }
            },
            "validationMode": "ENFORCING|PERMISSIVE|DISABLED"
          },
          "headerTransformations": {
            "renameHeaders": {
              "items": [
                {
                  "from": "original-name",
                  "to": "new-name"
                }
              ]
            },
            "setHeaders": {
              "items": [
                {
                  "name": "header-name",
                  "values": ["header-value"],
                  "ifExists": "OVERWRITE|APPEND|SKIP"
                }
              ]
            }
          },
          "queryParameterTransformations": {
            "filterQueryParameters": {
              "type": "BLOCK|ALLOW",
              "items": [
                {
                  "name": "query-parameter-name"
                }
              ]
            },
            "renameQueryParameters": {
              "items": [
                {
                  "from": "original-name",
                  "to": "new-name"
                }
              ]
            },
            "setQueryParameters": {
              "items": [
                {
                  "name": "query-parameter-name",
                  "values": ["query-parameter-value"],
                  "ifExists": "OVERWRITE|APPEND|SKIP"
                }
              ]
            }
          }
        },
        "responsePolicies": {
          "headerTransformations": {
            "filterHeaders": {
              "type": "BLOCK|ALLOW",
              "items": [
                {
                  "name": "header-name"
                }
              ]
            },
            "renameHeaders": {
              "items": [
                {
                  "from": "original-name",
                  "to": "new-name"
                }
              ]
            },
            "setHeaders": {
              "items": [
                {
                  "name": "header-name",
                  "values": ["header-value"],
                  "ifExists": "OVERWRITE|APPEND|SKIP"
                }
              ]
            }
          }
        }
      }
    ]
  }
Task 3: Create Connections
There are 2 connections we need to create. First connection is the Trigger REST Connection. This connection will be used to expose an endpoint in Oracle Integration. With this endpoint, you can call the migration process as a REST service, passing the source data of your APIs.
The second connection will be used to call the OCI API Gateway REST service to create your APIs deployments. The OCI API Gateway REST documentation can be read here: Deploying APIs via REST
If you don't know how to create an Oracle Integration Connection, you can view here: Create a REST Connection
- Search the REST Adapter:
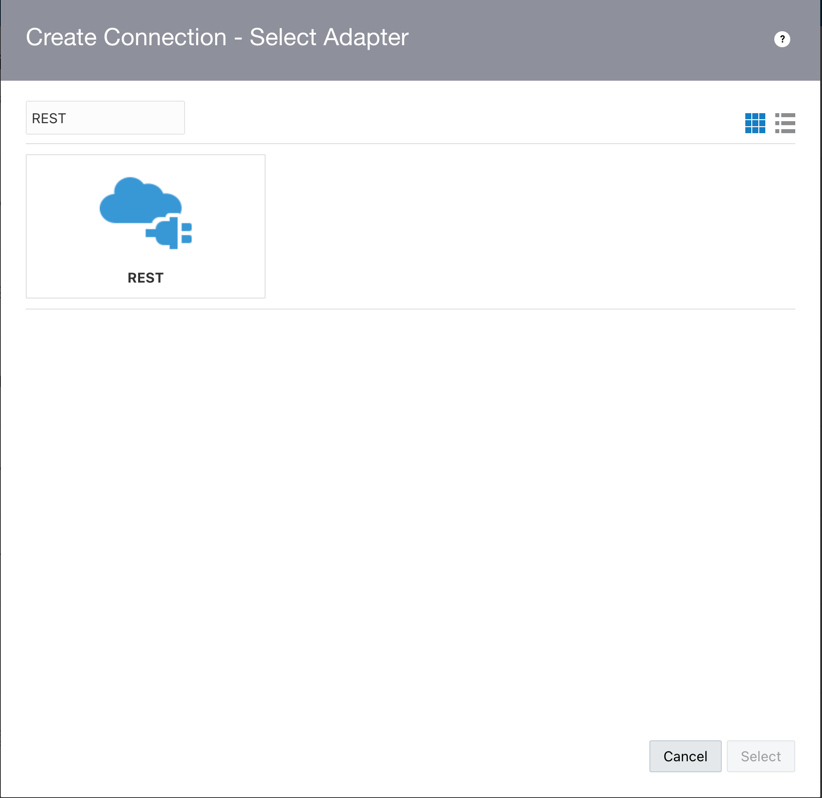
- Give a name and identifier, for example, give the name "REST_EXPOSE". This is the first connection. Select the Trigger Role. Trigger Role means you will expose the connection as a REST endpoint.
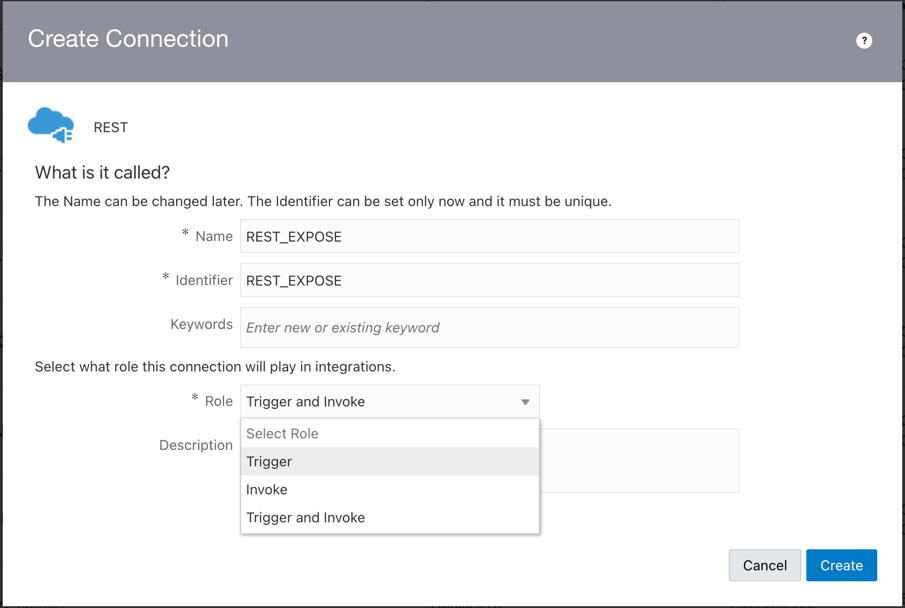
- For your Trigger Endpoint, you can execute a request with the Oracle Integration Basic Authentication. So, you can use an username and password.

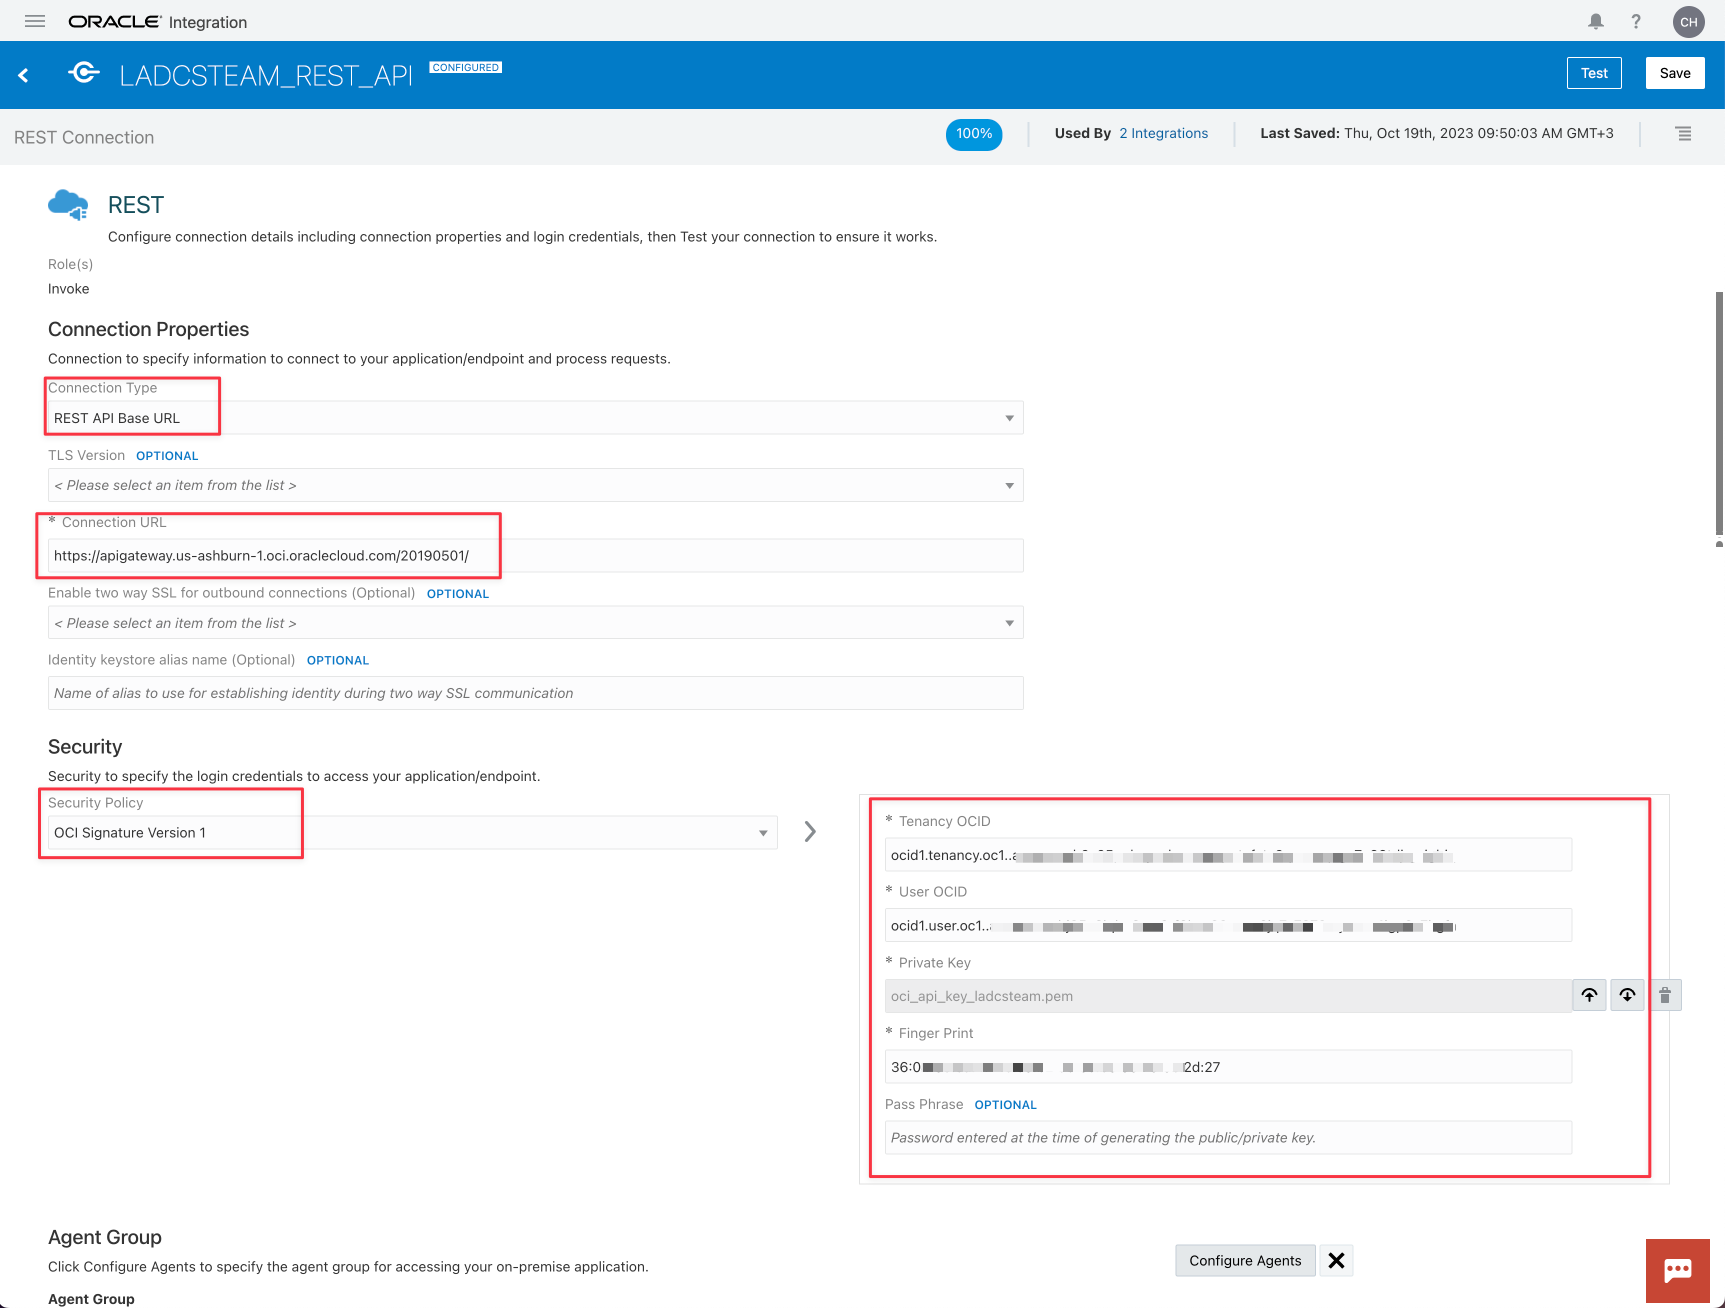
- In the second connection, as you did in the first connection, give a name and identifier (for example, "APIGW_REST_API"). Remember to select the Invoke type unlike the first configuration. Select the proper OCI API Gateway REST for your region (in the example, the region is Ashburn). See here to view the proper endpoint for your region OCI API Gateway endpoints. Obtain your OCI Credentials to provide access to the OCI API gateway services.


Task 4: Create the Integration
The process of migrate your APIs source metadata to the OCI API Gateway is:
- Expose the Trigger as a REST Service in Oracle Integration
- Initialize the Targets OCI API Gateways (environments like QA and DEV)
- Initialize the Compartments for the targets
- Execute a Loop to process all APIs in the source metadata
- Translate the source metadata to the OCI API Gateway metadata
- Execute a Request REST Service to the OCI API Gateway

- Expose your Integration with your Trigger REST Connection created previously

-
Give a name to your request endpoint
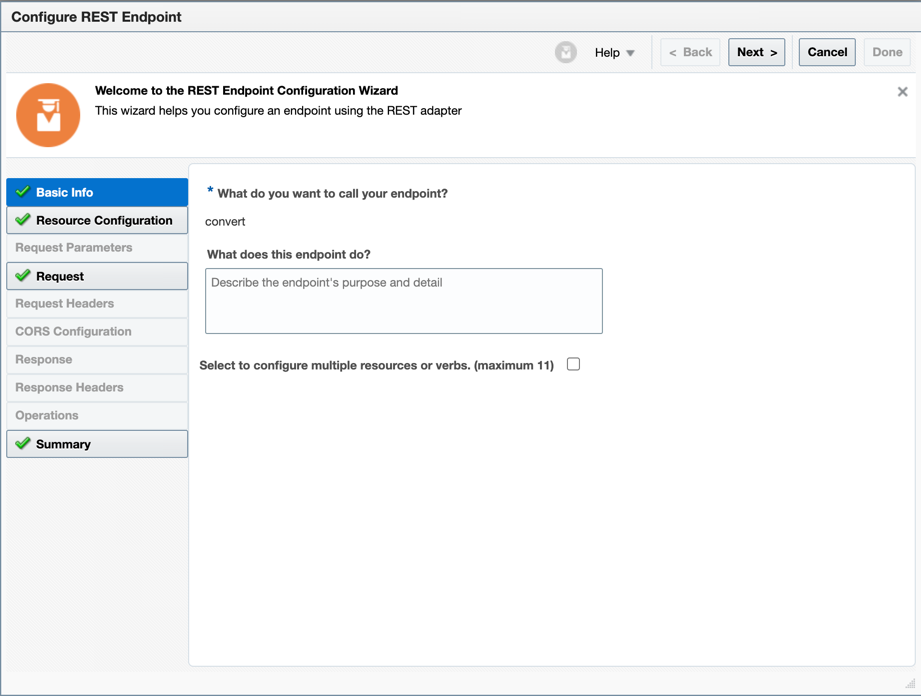
-
Give a path (for example, /convert) and select the POST method. Remember to stablish a request payload.

-
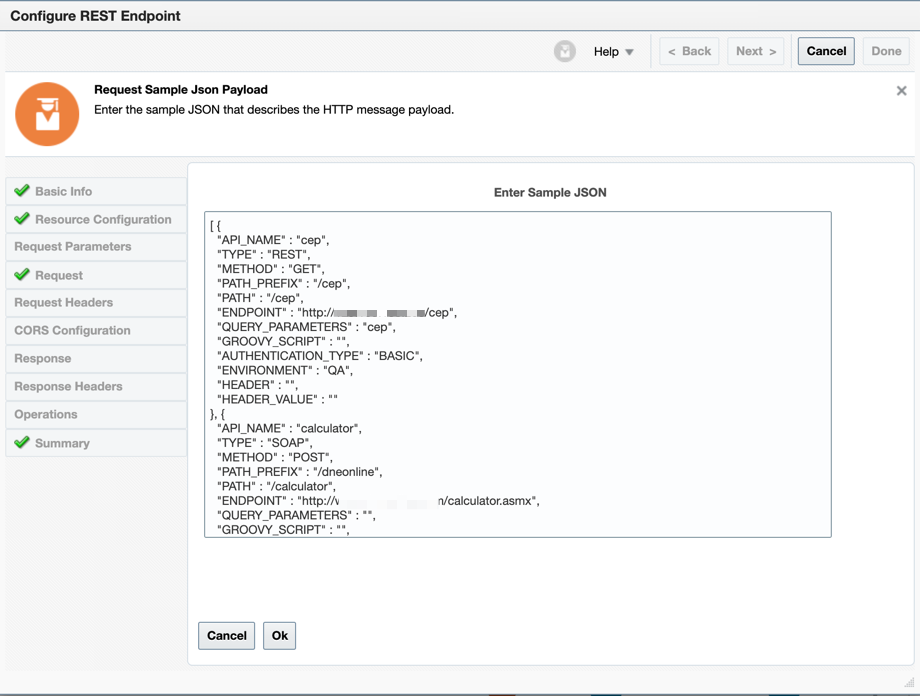
Now you can select the "JSON Sample" and paste your JSON source structure
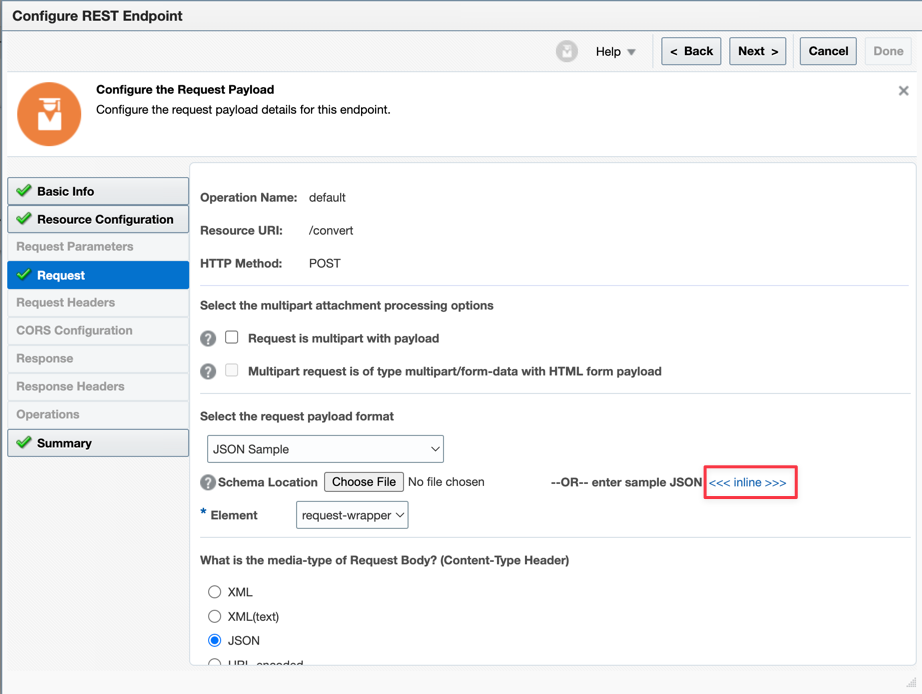
-
Paste the JSON here
-
Now let's initialize the variables for your API Gateways instance (each environment is a new API Gateway instance). Create a variable for the METHOD. Remember you can use several methods in REST (GET, POST, PUT, DELETE, ANY) and need to use POST in SOAP Services.


- Create a FOR EACH Loop. This will process the source JSON list

-
Edit the For Each Action and drag and drop your Loop Level Array to the "Repeating Element" Attribute
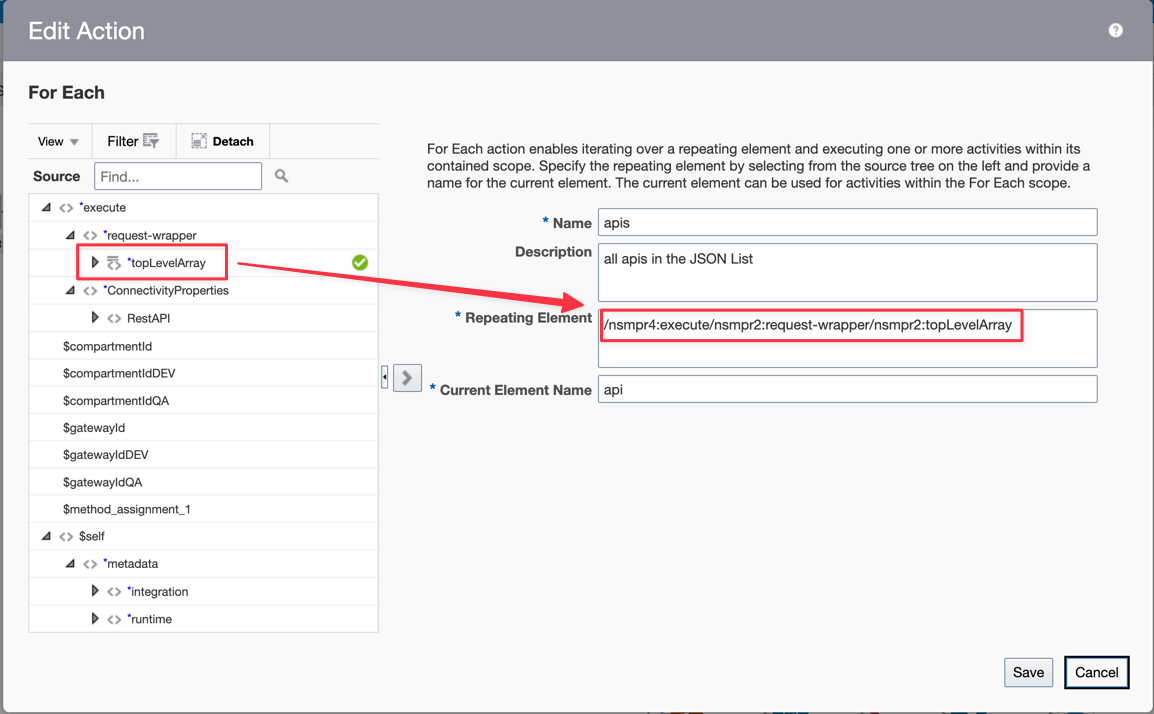
-
Now let's configure the environment redirection. Create a Switch Action and put the IFs and the assignments for each condition.


- Create the first condition for the QA environment

-
Verify in the source metadata ENVIRONMENT attribute and test if has "QA" value.
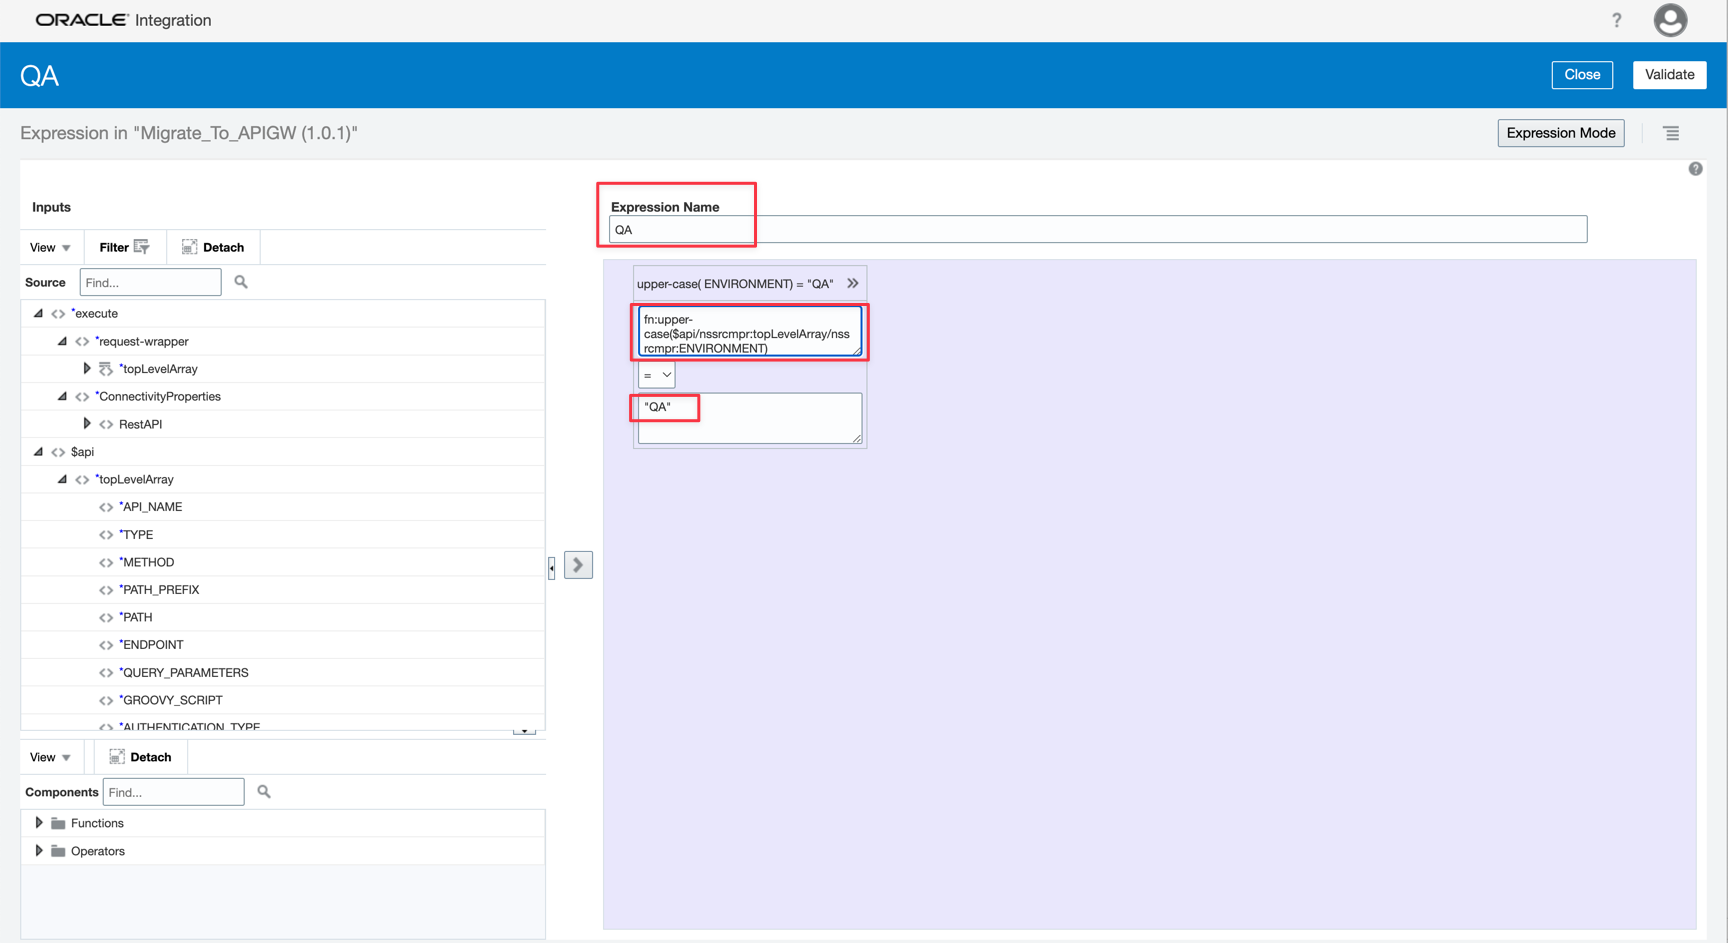
-
If the condition is true, you need to assign the correct environment. A GatewayID and CompartmentID is an OCID value. You need to assign the correct IDs to the variables.
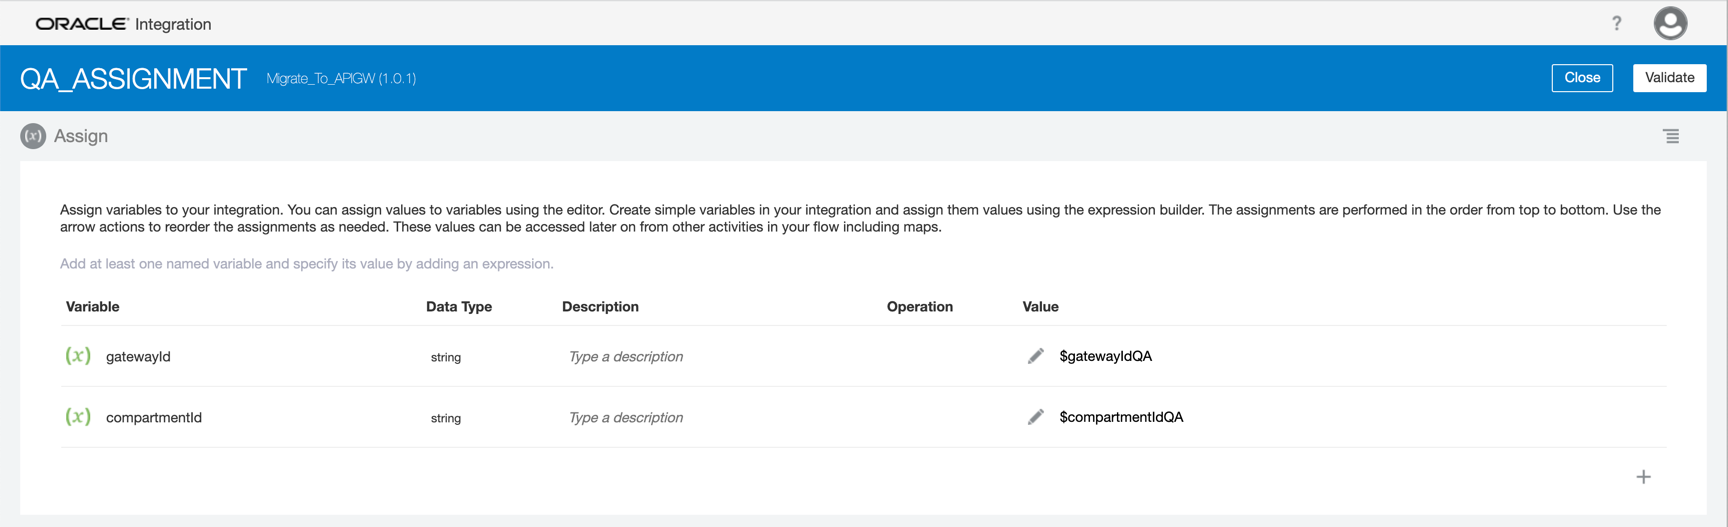
-
Do the same for the other environments


- Now let's view if your API is a REST or SOAP service. If your API is a SOAP service, you must configure the Method as POST.

-
Create an IF condition to test the service type
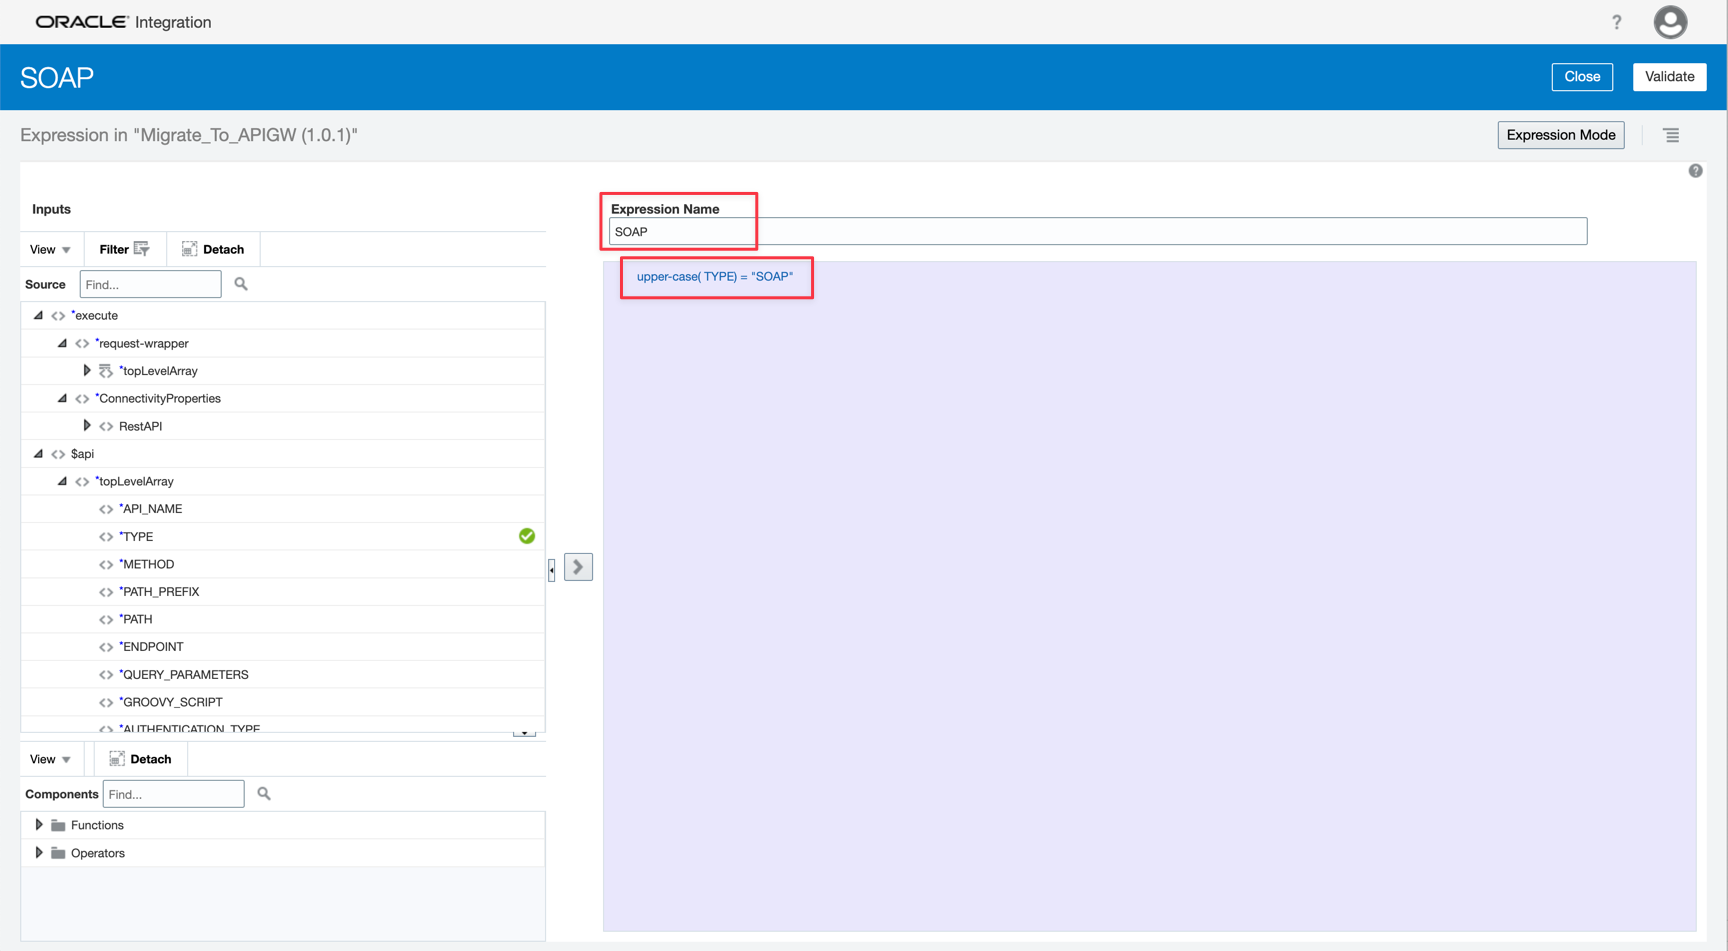
-
Assign the POST value to the method variable


- In other situations, the source attribute gives the correct method


- Let's map the source metadata attributes to the OCI API Gateway parameters. Before the mapping action, you need to configure the OCI API Gateway REST Adapter.

- Configure first the connection

- Give a name for this service. The path must be /deployments and the method must be POST. Remember to configure the request payload.

- You can't paste the JSON OCI API Gateway structure because of the large size of it. So you need to upload a file with the content. The complete JSON Structure is here apigw_structure.json

- And finally, map the target metadata

You can see the Oracle Integration artifact here OIC Migrate you Source API to OCI API Gateway. This example of artifact does not intend to be used as a final process to your migration and has only the objective to illustrate the process. Use this artifact to guide your real implementation.
Task 5: Test the migration
Now we can test the migration. If you don't know how to test your application, you can follow these steps:
Activate and Deactivate Integrations Testing REST trigger-based Integrations in OIC Console

Fill the Body with your source JSON data

Run the test and wait until the finish

Go to the OCI API Gateways instance deployments and see the creation of your APIs.

Related Links
- Creating an API Resource with an API Description
- Creating an API Deployment Specification
- Deploy an API using OCI CLI API in Python
- Deploying an API on an API Gateway by Creating an API Deployment
- Deploying APIs via REST
- Create a REST Connection
- OCI API Gateway endpoints
- Activate and Deactivate Integrations
- Testing REST trigger-based Integrations in OIC Console
Acknowledgments
- Author - Cristiano Hoshikawa (Oracle LAD A-Team Solution Engineer)